

The ultimate end of lease cleaning guide
We have written this end of lease cleaning guide not just to show you what to do, but to show you what we do.
As you see it's not easy, and there is hundredths of tasks that goes into successfully recovering a bond back.
Kitchens
OVEN
-
Either white standalone ovens or built-in stainless-steel ovens.
-
Always place a towel below the oven for protection of the floor/tiles
-
Remove all components of the oven
-
Place racks in soapy water and use metal scourer/razor blade tool to remove
-
Spray internal of oven with Selleys oven cleaner including baking trays.
-
Heat oven for 90 degrees for 10minutes (after spraying the oven leave the room and focus on another area until 10 minutes has passed)
-
Use metal scourer for glass door and internals of the oven, use a razor blade if you need to.


If the oven is a white stand alone oven you must remove it from its cavity and clean around and behind it


Always protect the floor with towels, especially timber floors as oven cleaner can damage the floor


Remove all food debris from the gap with scissors and cloth
Soak oven racks in soapy hot water


Spray baking trays and internal of the oven with Selleys Oven Cleaner


After the oven has cooled down using a green scourer sponge to remove all the residue which should wipe off quite easily now


Remove food from the gap and clean oven door with microfibre cloth and windex


Clean internal of the oven with metal scourer including bracket on roof facing the door


Clean plastic lining off any food/liquid
Remove any stubborn bake in food with scraper


Remove baked in food from oven racks with scraper and scourer.
If stubborn spray with oven cleaner and heat in the oven.


Use metal scraper on both side of the baking tray/s


Remove and food from where the oven door and cabinet meet


Now the oven is clean re-insert the oven racks and ensure the front of the door is polished clean and no marks on stainless steel or glass
FRIDGES


-
Take a photo of the fridge before-hand in case you forget how it all goes back together.
-
If the fridge can be removed from the cavity carefully slide it out and clean above fridge, behind it and cavity/floor.
-
Remove all components of the fridge
-
Do not use a green scourer on clear plastic as it will damage the plastic
-
Clean the plastic lining of the fridge.


Ensure top of plastic fridge lining is clean and free of food debris
Ensure top of door is also clean


Never use green scourer on any clear plastics in the fridge, this will scratch the plastic.
Only use the yellow soft side of the sponge.
Wash all the components, clean dry and reinsert into the fridge.
RANGEHOODS


In some oler style rangehoods you will find a white exhaust fan. Please wash with sponge, hot water and soap. Dry with clean cloth and check no grease remains on the exhasut fan casing.
Do not use green scourers on the range hoods, it will scratch the surface.
You can use metal sponges softly if the stainless-steel wont scratch, however it is more suitable to use yellow side of sponge with bleach.
Very soft high-quality stainless steel will scratch from metal scourers so only use the soft yellow sponge on this material
If the filters are very greasy spray with Selleys Oven Cleaner.


Remove the filters and soak in baking soda, dishwashing liquid and hot water


Use brush to remove grease from the filters
Clean the internal components of the rangehood


Use a soft metal brush to remove the grease from the corners
Use green scourer to degrease internal unit


If grease is stubborn on the external of the ranghood use very softly a scourer ensuring it does not scratch the surface (most stainless steel is durable and resists scratching)
Then use windex and microfibre cloth to polish.


Remember to de-grease the entire unit including the top of the sliding shelf, the housing unit and the stainless steel lip.
STOVETOPS


There are two main stovetops
Gas stop and black induction


Remove components and soak in dishwashing liquid and baking soda with hot water
Vacuum the food debris from the craters in the stove top


Remove all the knobs and polish them.
Clean all the food, grease from the area under the knobs with soft metal brass tooth brush


Use soft metal brush on the grooves of the knobs
Use metal scourer to remove grease.
(most stainless steel stove tops are durable enough to resist scratches from soft application from metal scourer, if a high quality soft stainless steel stove top is installed only use microfiber cloths)


Use soft metal brush on iron components of the stovetop


Use soft metal brushes on corners of the iron and stainless.
Use metal scourer on the burner grates, if stubborn build up use razor blade.


Use towels to protect the countertop table when cleaning the burner grates
Use metal brush on sides of burner rings to remove marks.


Spray stove top with windex/polish and put all the elements back together
Clean corner where stove top meets table with soft metal brush and remove any food debris


Use a razor blade on black induction stove top to remove any baked in food.
DISHWASHERS


Do not use green scourers or metal scourers on front of dishwashers.
Only use bleach and yellow side of sponge
You can use a scourer on the kickboard part below the door


Remove the filter from the dishwasher


Use a brush and hot running water to clean the filter of all food debris
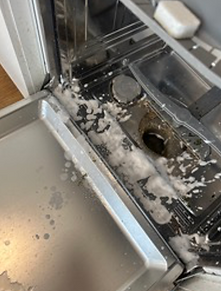

Wash inside of the dishwasher with soap and water ensuring you clean the sides of the door


Ensure the top of the door is clean.
Ensure the sides of the kitchen cabinets which face towards the dishwasher are also cleaned and ensure the corners of the door are cleaned.


Clean stainless steel door with yellow spong, soap and water.
Clean black seal with brush and remove debris


Clean black lining seal of dishwaher with green scourer and gumption.
Clean where door meets base of dishwasher with soft metal brass brush


Check and clean dishwashing powder draw.


Polish all stainless steel internal and external stainless steel and place components back together
Remember to even clean the concave edge at bottom of the dishwasher draw.
SINKS


Soak plug in bleach, cover base of sink in bleach


Use soft metal brass brush and detail tap


Use gumption and a microfiber cloth to clean and polish all the sides of the sink.
Polish the entire sink/tap with steel kleen or windex
CUPBOARDS/DRAWS


Ensure the kickboard is clean (where the kitchen floors an bottom of the cabinets meet


Only use the yellow soft side of sponges with bleach when cleaning exterior of the kitchen cabinets.
You can use the green scourer side on the internal laminates


If there is difficult grease on the internal of the cabinets use the green scourer and gumption.
REMEMBER to remove the grease from the underside of the hanging kitchen cabinets (look up from the countertop table)

If you encounter heavy stains on the internal laminates use a metal sponge and gumption/bleach.

Clean the splash back and counter top table
DO NOT use bleach on marbles and any porous stones.
BATHROOMS
-Never, ever used steel wool or metal brushes on porcelain surfaces
-Never use bleach on marble
-Never let bleach sit on the tiles too long (more than 15 minutes)
- DO NOT STAND ON TOILET
- BE VERY CAREFUL WITH GLASS IF CUPBOARDS HAVE GLASS PANELS


Start from the top down.
Remove and flys or speck of mould from the ceiling.
Clean ceiling fans
SHOWERS


Clean frame above showers
Bleach shower glass and use squidgee to remove liquid.


If there is mineral deposits on the glass use Bar Keepers Friend Toilet Bowl Cleaner to remove


If there is mineral deposits on the glass of the soap shelf use Bar Keepers Friend Toilet Bowl Cleaner to remove


Clean and polish the stainless steel taps and soap tray


Remove soap build up from the grated soap trays with a metal scourer
Remove mould from the grout with a soft metal toothbrush


Ensure metal frames are bleached and polished
Use soft metal brushes on any fiddly bits such as where the door meets the hinges


Ensure any black mould is removed from metal frames with a soft metal brush


Clean grout with soft metal brush
Clean drains with soft metal brush


If the bathroom drains lift ensure to remove and clean hair/debris from them


If shower floor has stubborn stains use Gumption
Bleach shower floor
TOILETS

Bleach toilet bowl, if below has mineral deposits empty the water and use Bar Keepers Friend Toilet Bowl Cleaner
NEVER USE ANY METAL SPONGES ON PORCELAIN


Clean all corners of the seats
DO NOT use green scourer on the plastic seat as it will scratch it
Only use YELLOW SOFT SPONGE on plastic seat


With bleach and gumption clean under side of ring of porcelain toilet
With green scourer sponge and bleach use force below the waterline


Clean rings which attach the seat to the toilet bowl
The only time you can use a metal scourer anywhere near a toilet is to clean the under side of the seat if a yellow ring exists around the ring.


Always remember to clean the toilet roll holder and flush buttons


Clean and bleach all exterior surfaces of the toilet including the cistern (water tank) and the flush button
SINKS


Twist plug off, remove hair/debris from drain.
Bleach under side of plug


Bleach entire sink, never EVER use metal scourer on porcelain sinks
Clean under sinks, clean pipes under sink


Clean filly bits of tap with soft metal brush including undersides of the tap itself


Ensure to clean under sides of sink with bleach
VANITY CUPBOARDS


Squidgee the mirror and bleach all the internal white laminates, including behind mirror door


Clean above the vanity and remember to look up from the sink and clean the underside of the vanity


Bleach walls and wash door


If metal drains are dirty use metal scourer and mop/bleach floors
LAUNDRY


Clear lint from above the dryer, clean lint from door latches


Wash laundry doors and clean dust from door frames


Clean fan and bleach sink


Bleach plug of sink and entire sink


Wash and clean exterior of sink, remove rust marks from internal cabinet with gumption and metal scourer


Clean internal part of the door and above surface area of the door

Clean all external surfaces of dryer including front of door
Dust and clean vented grills with soft brush
Clean switches and wipe cable of dryer


Clean internal dryer door including plastic ring
Clean lint from filter and wash filter


LIVING AREAS


Wash and sterilise external and internal of any cabinets/linen closets


Clean:
Air con vents
Skirting boards
Switches
Air conditioning units
Marks from walls


If there are picture frame plasterboard remove dust with wash cloth.
If there are ventilation holes remove dust with broom and soft head accessory on vacuum cleaner.
BEDROOMS
-
Work your way HIGH to LOW
-
Look at tops of walls/ceiling for spider webs/insects and remove
-
Clean light fitting
-
Clean light switch
-
Clean Ceiling Fan or Air Conditioning Vent/grill
-
Clean built-in wardrobe, remove draws, clean tracks of sliding doors, clean mirrors
-
Spot check walls
-
Clean blinds/plantation shutters/venetian blinds
-
Vacuum carpets or mop floors


Clean ceiling fans/light fittings
Squidgee mirrored built in wardrob


Clean tracks of mirrored built in wardrobes
Clean skirting boards and internal walls of built in wardrobes


Clean and sterilise draws, clean inside tracks of draws


Clean finger print marks off sliding doors
Squidgee internal windows


Clean tracks of windows
Clean door
Clean skirting boards
Clean switches
Clean marks off walls


Clean venetian blinds slat by slat
Pay particular attention to the under side of the weighted slat
If plantation shutters are installed clean slat by slat
If roll down vinyl block out blinds installed ensure no insects or dirt on the blinds and clean the weighted slat
BALCONIES


Squidgee both sides of the glass
Wipe down all the frames


Clean tracks of sliding doors
Clean air con units/or caged frames
Clean glass balustrades including glass and frames
Clean spider webs from corners of the ceilings
Wipe all switches down
Mop floors
PRECAUTIONS
DO NOT get Gumption on the carpet
DO NOT STAND on the toilet
DO NOT STAND on kitchen benches bathroom cupboards
DO NOT STAND on black induction stove tops
DO NOT put bleach in a bucket and then use on hardwood floors.
BE VERY CAREFUL with glass from rangehood fans.
DO NOT DRAG buckets across WOODEN FLOORS, ALWAYS USE HANDLE OR PICK BUCKET UP
CHECKLIST
Kitchen
Chemically clean internal oven, remove any baked in food off baking trays, grill racks and clean glass, polish stainless steel and ensure no food debris trapped around the frame and the base
De-grease rangehood extraction fan ensuring filters cleaned and ensure internal housing unit and any moving parts are also cleaned and wiped free of any grease/dust
Ensure dishwashing machine filter is clean, free from food and ensure black plastic seal is also cleaned and ensure the door of the dishwasher is also cleaned especially where the door and the housing unit meet
Ensure stove top is cleaned, remove all components, scrub and remove any baked in food; including removing the knobs and cleaning under them and the actual knobs themselves.
Clean fridge if applicable, also clean the cavity of the fridge
Clean inside and outside of all draws, cupboards and shelves including the kickboard where the bottom of the cabinets meet the floor
Clean splashback, countertop table and all switches. (DO NOT USE BLEACH ON POROUS TABLE TOPS OR MARBLE
BATHROOM
Clean and bleach shower including shower glass, frames, any taps, faucets and soap trays. Ensure all mould is removed from the grout with soft metal brass brushes. Ensure shower floor is bleached and grout cleaned. Lift and clean shower drain if applicable (DO NOT USE BLEACH ON MARBLE)
Clean and bleach bath tub including polish taps, plug and remove any hair debris from drain
Clean ceiling fan, light fitting, window, window tracks, switches, shine faucets and shower heads, polish and chrome fixtures
Clean floor to ceiling tiles, mirrors, clean door, bleach, mop and vacume floors (DO NOT USE BLEACH ON MARBLE)
Bleach and clean sink bowl, clean tap and clean inside and outside of any cupboards, draws and shelves
Bleach and clean toilet bowl, cistern (water tank), toilet flush, seat, edges where seat meets the toilet and exterior of the toilet including behind and around the bowl
LAUNDRY
Clean above dryer, the external housing of the dryer, the door external and internal, remove lint and clean filter, clean cable free of dust
Ensure ceiling fan clean of lint, ensure ceiling has no lint, clean doors internal and external
Clean inside, and outside of laundry tub, polish sink, clean plug, drain and tap.
If washing machine clean detergent draw, lid, all internal and external housing.
Clean any cabinets, draws, switches, shelves and mop floors ensuring grout is free of grime
BEDROOMS/LIVING AREAS
Ensure ceiling fans,air con vent, light fittings cleaned and if ventilation grills exist on the wall clean of dust and debris
If there are air conditioning units clean the external housing including the air flow blards and remove the filters, clean and re-insert
Ensure no insects, spider webs on the ceiling or corners of the walls. If there are picture frame plasterwork clean free of dust
Clean all skirting boards, switches door frames, doors and marks off walls are removed
Clean internal windows including tracks/frames of the windows
Clean venetian blinds, plantation shutters slat by slat and if the property has vinyl roll down block out blinds ensure no insects or marks on the blind and clean the weighted slat at the bottom of the blind
Clean mirrored built-ins, linen closets; including the sides where the plastic hand rail is, ensure tracks of the sliding doors are also cleaned. Clean and wardrobes shelves, draws and remove draws and clean behind.
Mop and vacuum floors, if carpeted floors use edging accessory where thee skirting baord meets the carpet to ensure removal of debris,
BALCONIES
Clean both sides of the glass, including the frames of he doors and clean tracks of all the sliding doors.
Wash and clean flyscreens, including track within the flyscreen door
Clean glass balustrade and frames of ballustrade
Ensure no spider webs, insects on ceiling/walls, clean switches and mop/vacuum the floors
OTHER
Garage is to be sweeped, cupboards and shelves cleaned, no grease on floor.
If your property is a house the external facade is to be free of spider webs
If your property is a house the garden must be maintained, hedges trimmed and grass cut
If your property is a house with a pool the pool glass must be cleaned and water clean
Ensure bins are empty or outside ready for next bin collection night
If you have had pets ensure carpets professionally steam cleaned and provide the receipt to your property manager
If you have had pets ensure the property is professionally fumigated and provide the receipt to your property manager
DISCLAIMER - The checklist above is for tenants attempting to do their own clean.
For a list of our inclusions and exclusions please see our checklist HERE
Recommended Cleaner For Over 20+ Real Estate Agencies


